Author: Ren Rose

  • Autumn Breakfast: Scrambled Eggs on Toast

    Autumn Breakfast: Scrambled Eggs on Toast

    A Warm, Comforting Start to Crisp Mornings

    Autumn mornings carry a quiet kind of calm. The air feels cooler, the light softer, and there’s a natural pull towards breakfasts that are warm, familiar, and grounding. Scrambled eggs on toast is one of those breakfasts – simple, nourishing, and deeply comforting.

    It’s the sort of meal made slowly, eaten at the kitchen table while the kettle boils, with the first mug of tea warming your hands. Nothing elaborate, nothing rushed – just good food and a gentle start to the day.

    Why Scrambled Eggs on Toast Feels Perfect in Autumn

    This breakfast suits autumn so beautifully because it is:

    • warm and satisfying
    • soft and comforting
    • quick, but not hurried
    • nourishing without feeling heavy
    • rooted in everyday simplicity

    As the mornings grow cooler, eggs on toast feel like exactly what the body wants – something warm, steady, and familiar.

    Ingredients (Serves: 1)

    • 2 large eggs
    • 1 tbsp milk or cream (optional)
    • Small knob of butter
    • Salt and freshly ground black pepper
    • 1–2 slices of bread (sourdough, farmhouse loaf, or wholemeal work beautifully)

    Optional additions:

    • chives or parsley
    • a little grated cheese
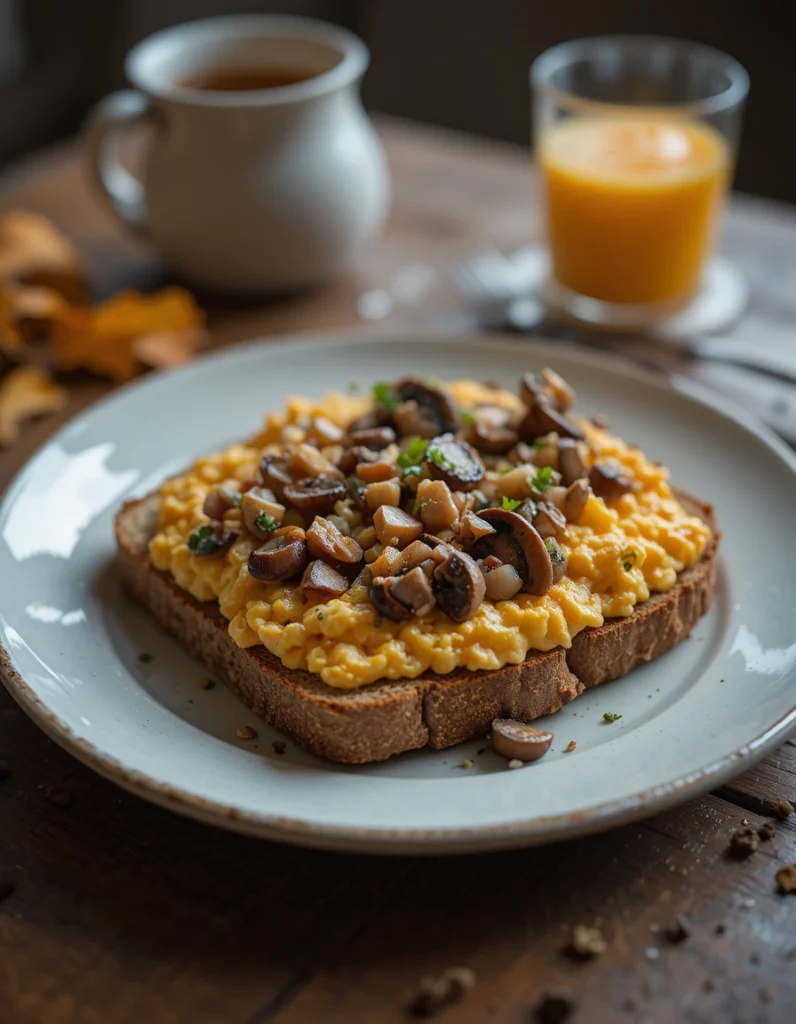
    • sautéed mushrooms
    • a drizzle of olive oil

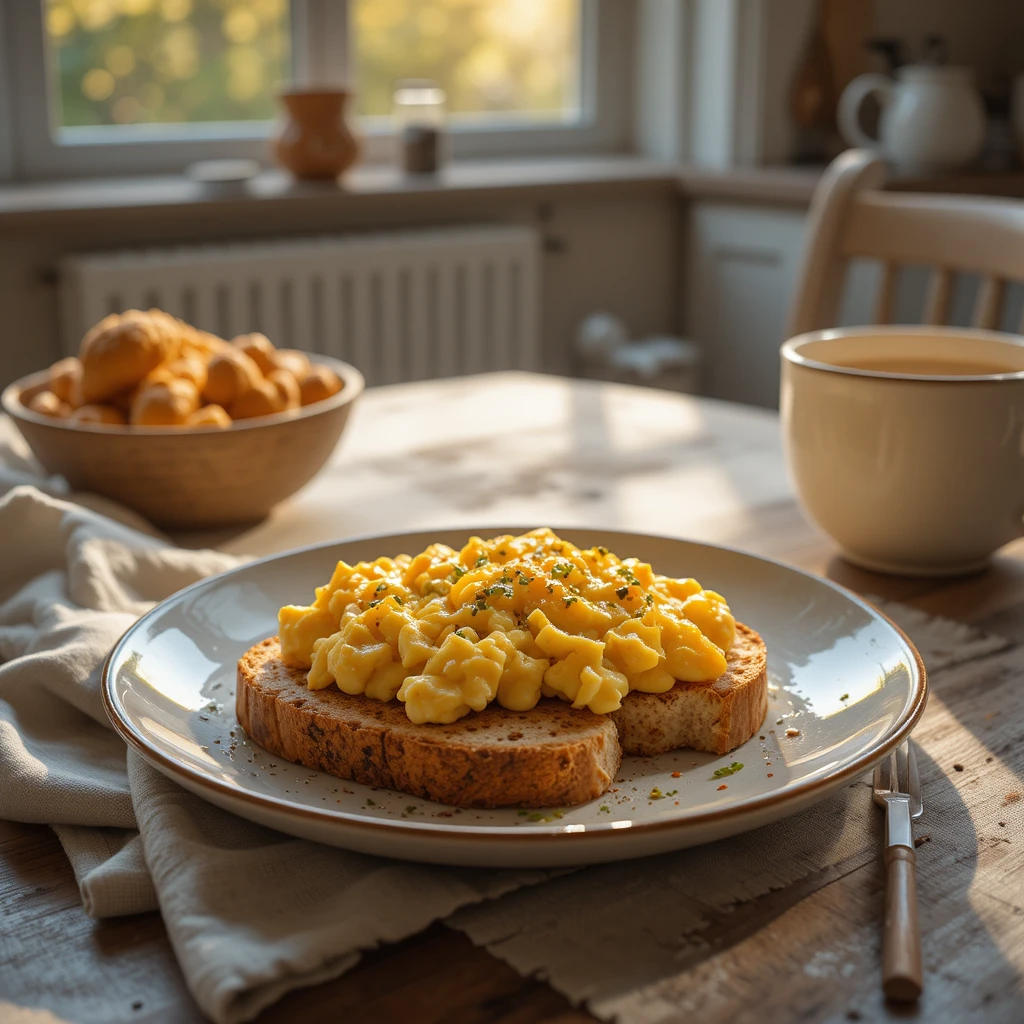
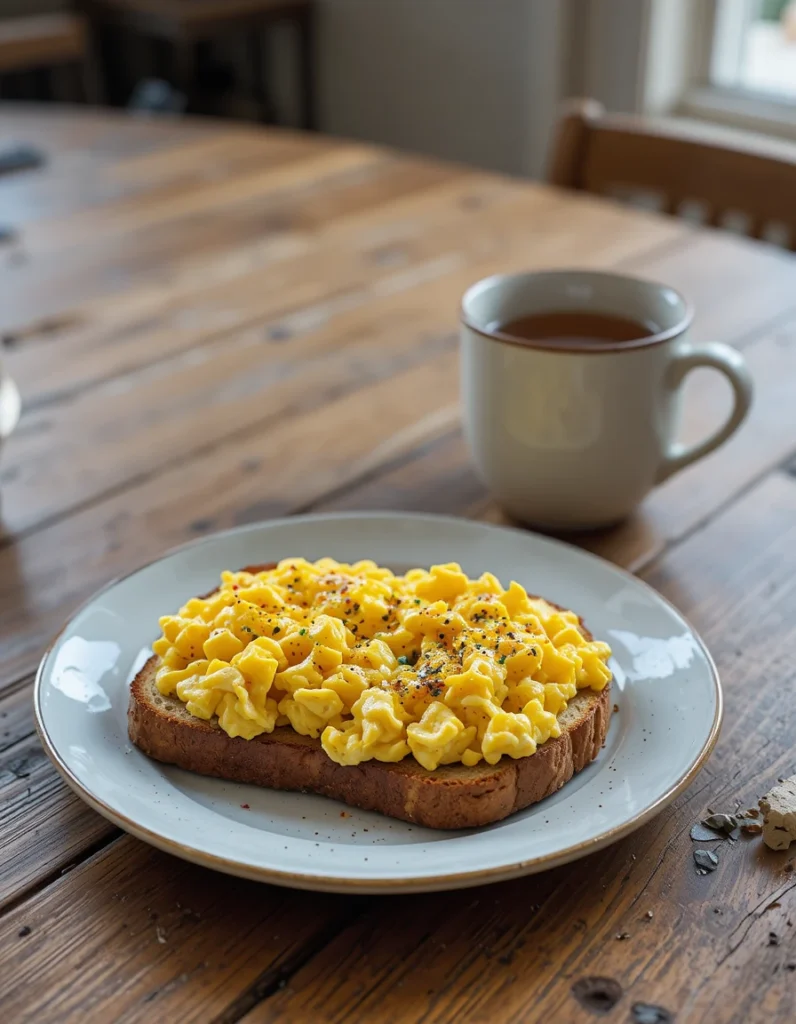
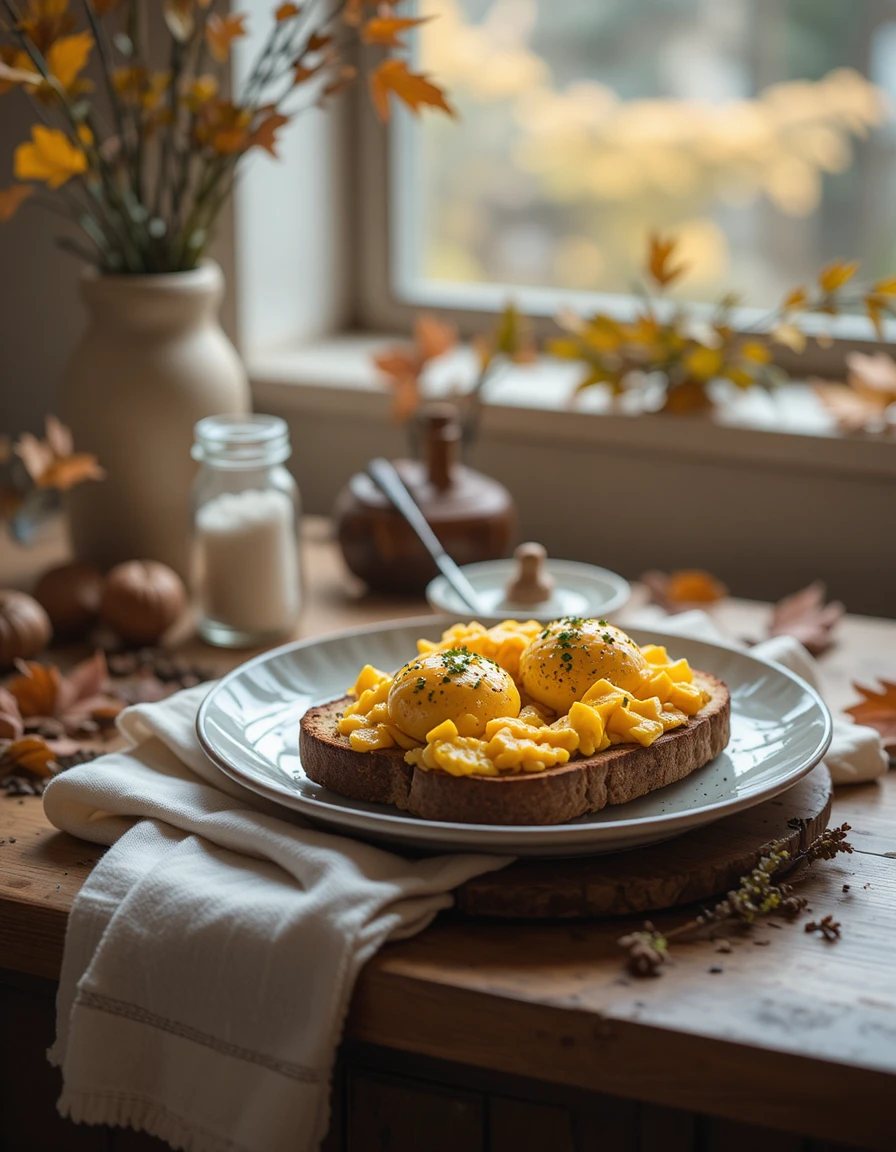
    How to Make Soft, Comforting Scrambled Eggs

    Step 1: Toast the Bread

    Toast your bread until just golden and warm – not too crisp, so it stays comforting.

    Step 2: Whisk the Eggs

    Crack the eggs into a bowl, add a splash of milk or cream if using, and whisk gently with a fork.

    Step 3: Cook Slowly

    Melt the butter in a non-stick pan over low heat.
    Add the eggs and stir gently with a wooden spoon or spatula, moving slowly to keep the curds soft.

    Step 4: Season & Serve

    Remove from the heat while still slightly creamy.
    Season with salt and pepper and spoon generously over the toast.

    Serve immediately, while warm and comforting.

    Choosing the Right Toast

    Autumn breakfasts suit heartier breads that bring warmth and texture:

    A good slice of bread turns scrambled eggs into a truly grounding breakfast.

    Autumn Variations

    To gently lean into seasonal flavours, try:

    • Scrambled eggs & mushrooms – earthy and autumnal
    • Eggs with cheese – comforting and filling
    • Eggs & herbs – fresh but cosy
    • Eggs on buttered toast – classic and simple
    • Eggs with roasted tomatoes – soft and warming

    Each variation keeps the calm simplicity of the dish while adding a seasonal touch.

    Creating a Slow Autumn Morning

    Scrambled eggs on toast are best enjoyed when you give yourself a little space to breathe:

    • eat at the table, not on the go
    • open the curtains to soft morning light
    • keep your phone away for a few minutes
    • savour the warmth and quiet

    Sometimes the most ordinary breakfasts are the ones that ground us the most.

    Final Thoughts

    Scrambled eggs on toast is autumn breakfast at its most comforting – warm, familiar, and quietly nourishing. It doesn’t try to impress, but it always delivers exactly what’s needed on a crisp morning.

    Soft eggs, warm toast, gentle light – a simple way to welcome the day. 

  • Autumn Breakfast: Bread & Honey: A Gentle, Golden Start to Crisp Mornings

    Autumn Breakfast: Bread & Honey: A Gentle, Golden Start to Crisp Mornings

    Autumn mornings ask us to slow down. The light is softer, the air cooler, and there’s a quiet comfort in beginning the day with something simple and nourishing. Bread and honey is one of the most timeless autumn breakfasts – warm, unfussy, and quietly comforting.

    Fresh bread, lightly toasted, with honey slowly melting into the surface feels like a small luxury without any effort at all. It’s the kind of breakfast enjoyed at the kitchen table while the kettle boils, wrapped in a cardigan, with the season gently unfolding outside the window.

    Why Bread & Honey Feels Perfect in Autumn

    This simple pairing suits autumn so naturally because it is:

    • warm and grounding
    • gently sweet, not overpowering
    • comforting without being heavy
    • rooted in tradition and simplicity
    • easy to enjoy slowly

    Honey brings a golden warmth that echoes autumn tones, while bread – whether crusty, soft, or homemade – adds substance and familiarity.

    Choosing the Bread

    Almost any bread works, but autumn mornings suit heartier, rustic choices:

    • farmhouse loaf
    • sourdough
    • seeded bread
    • wholemeal or granary
    • fresh bakery rolls

    Lightly toast until warm and just golden – enough to bring out the flavour without losing softness.

    Choosing the Honey

    Honey adds depth and character to this simple breakfast. Try:

    • runny honey for easy drizzling
    • set honey for a thicker, comforting spread
    • local honey for a seasonal, countryside feel
    • floral honey for a lighter sweetness
    • darker honey for richer, autumnal notes

    A spoonful goes a long way – this breakfast is about balance and simplicity.

    How to Serve Bread & Honey

    Enjoy this autumn breakfast:

    • with warm toast and a drizzle of honey
    • alongside butter if you like extra richness
    • with a mug of tea, coffee, or warm milk
    • paired with fruit like apple slices or pears
    • with yoghurt or a boiled egg for a fuller breakfast

    It also works beautifully as a mid-morning snack on cooler days.

    Autumn Variations

    If you’d like to gently adapt it with seasonal touches:

    • Honey & Apple: add thin apple slices
    • Honey & Cinnamon: sprinkle lightly for warmth
    • Honey & Nut Butter: comforting and filling
    • Honey & Yoghurt: spoon yoghurt onto toast for softness
    • Honey & Toasted Seeds: for texture and depth

    Each variation keeps the simplicity while leaning into autumn flavours.

    Creating an Autumn Morning Ritual

    Bread and honey is best enjoyed slowly. Try making it part of a gentle autumn routine:

    • wake a little earlier
    • open the curtains to cool morning light
    • toast the bread while the kettle boils
    • eat at the table, not on the go
    • take a few quiet moments before the day begins

    Sometimes the simplest breakfasts are the most grounding.

    Final Thoughts

    Bread and honey is autumn breakfast at its gentlest – warm, familiar, and quietly nourishing. It doesn’t rush you or demand attention. Instead, it offers a moment of calm before the day begins.

    Golden honey, warm bread, soft light – a simple way to welcome autumn mornings. 

  • Winter Steak Dinners: Hearty Comfort, Simple Pleasures & Cold-Weather Cooking

    Winter Steak Dinners: Hearty Comfort, Simple Pleasures & Cold-Weather Cooking

    There’s something especially satisfying about a steak dinner in winter. When the evenings are dark and the air feels sharp, steak brings warmth, richness, and that unmistakable feeling of being well-fed. It’s simple food, cooked with care – a sizzling pan, the scent of butter and herbs, and a meal that feels grounding after a cold day.

    Winter steak dinners aren’t about fuss or flash. They’re about comfort: well-seasoned meat, familiar sides, and taking the time to enjoy a proper meal at home.

    Why Steak Feels Perfect for Winter

    Steak suits the colder months beautifully because it is:

    • rich and satisfying
    • warming and filling
    • quick to cook but deeply comforting
    • ideal with winter sides like mash and roasted vegetables
    • perfect for cosy evenings at home

    It’s the kind of meal that feels like a reward – especially after a frosty walk or a long winter day.

    Choosing the Right Steak

    For winter cooking, look for steaks with good flavour and a little marbling:

    • Sirloin – balanced, juicy, and reliable
    • Ribeye – rich, buttery, and indulgent
    • Rump – full-flavoured and hearty
    • Fillet – tender and refined, perfect for special evenings

    Let the steak come to room temperature before cooking – it helps it cook evenly and stay juicy.

    Simple Winter Steak Method (serves: 2)

    Ingredients

    • 2 steaks
    • 1 tbsp olive oil
    • 25 g butter
    • 1 garlic clove, crushed
    • Fresh thyme or rosemary
    • Salt and freshly ground black pepper

    Recipe

    1. Season the steaks generously with salt and pepper.
    2. Heat a heavy pan over high heat until hot.
    3. Add olive oil, then the steaks.
    4. Cook for 2–4 minutes per side depending on thickness and how you like it cooked.
    5. Add butter, garlic, and herbs, then baste the steaks for the final minute.
    6. Rest the steaks for 5 minutes before serving.

    Resting is essential – it keeps the steak tender and full of flavour.

    Perfect Winter Steak Sides

    Steak truly shines when paired with comforting winter sides:

    Together, they create a plate that feels deeply seasonal and satisfying.

    Create a Cosy Winter Steak Night

    Turn steak night into a winter ritual:

    • dim the lights and light a candle
    • use warm plates
    • serve with a glass of red wine or winter mocktail
    • play soft music in the background
    • enjoy the meal slowly, without rushing

    Even a midweek steak can feel special with the right atmosphere.

    Winter Variations

    • Steak & Mushroom Sauce: rich and earthy
    • Steak with Red Wine Jus: perfect for slow evenings
    • Steak & Chips (winter-style): chunky chips and pepper sauce
    • Steak & Mash: ultimate comfort pairing
    • Steak Salad (warm): lighter but still satisfying

    Final Thoughts

    A winter steak dinner is comfort food at its simplest and most satisfying. Rich, warming, and deeply familiar, it’s a reminder that good ingredients cooked well don’t need much embellishment – just time, warmth, and a little care.

    Cook slowly, serve generously, and enjoy the quiet comfort of a winter meal done right. 

  • Rich Winter Gravy: The Comforting Finishing Touch That Brings Everything Together

    Rich Winter Gravy: The Comforting Finishing Touch That Brings Everything Together

    In winter, it’s often the simplest things that make a meal truly comforting – and rich, homemade gravy is one of them. Glossy, deeply flavoured, and gently steaming, good gravy has the power to transform a plate of food into something warming, indulgent, and utterly satisfying.

    Whether poured generously over creamy mashed potato, spooned onto roast vegetables, or served alongside a slow-cooked joint, gravy is the quiet hero of winter cooking. It’s not rushed, not complicated – just carefully built flavour, stirred slowly, and enjoyed warm.

    Why Gravy Feels So Essential in Winter

    As the days grow colder, we naturally turn to meals that feel grounding and nourishing. Gravy adds:

    • warmth and richness
    • depth to simple ingredients
    • moisture and comfort
    • that familiar, homely feeling we crave in winter

    It brings everything on the plate together – especially during roasts, Sunday lunches, and cosy evening meals.

    Ingredients (serves: 4–6)

    • 2 tbsp fat from a roast tin (or butter if needed)
    • 2 tbsp plain flour
    • 500 ml hot stock (beef, chicken, or vegetable)
    • 1 tsp gravy browning (optional)
    • Salt and black pepper

    Optional flavour boosters:

    • splash of red wine or port
    • teaspoon of mustard
    • dash of Worcestershire sauce
    • fresh thyme or rosemary
    • finely chopped onion or shallot

    Recipe

    Step 1: Make the Roux

    Place the roasting tin (or a saucepan) over a low to medium heat.
    Add the fat and stir in the flour, cooking gently for 1–2 minutes to remove the raw flour taste.

    Step 2: Add the Stock

    Gradually whisk in the hot stock, a little at a time, to prevent lumps.
    Keep whisking until smooth and thickened.

    Step 3: Simmer & Build Flavour

    Allow the gravy to simmer gently for 5–10 minutes, stirring occasionally.
    Add any optional flavour boosters at this stage.

    Step 4: Season & Finish

    Taste and season with salt and plenty of black pepper.
    Strain if you prefer a silky finish, or leave rustic and spoonable.

    Serve piping hot.

    Tips for Extra-Rich Winter Gravy

    • Use pan juices whenever possible – they add unbeatable flavour
    • Warm the stock first for a smoother gravy
    • Simmer slowly to deepen the taste
    • Don’t rush seasoning – taste as you go
    • Strain for elegance, or leave chunky for farmhouse style

    Gravy thickens as it cools, so keep it gently warm before serving.

    What to Serve Rich Gravy With

    Winter gravy pairs beautifully with:

    It’s also perfect when spooned over leftovers the next day.

    Create a Cosy Winter Table

    Gravy is best served when:

    • the table is warm and inviting
    • candles flicker nearby
    • dishes are passed slowly
    • everyone gathers close

    Pour it generously and enjoy the quiet satisfaction it brings – it’s winter comfort in liquid form.

    Final Thoughts

    Rich gravy is one of winter’s simplest pleasures – slow, savoury, and deeply comforting. It doesn’t demand attention, but it quietly makes every winter meal feel complete.

    Stir gently, pour generously, and enjoy the warmth it brings to the table. 

  • Herb-Roasted Chickpeas: A Crispy, Comforting Winter Snack for Cosy Days

    Herb-Roasted Chickpeas: A Crispy, Comforting Winter Snack for Cosy Days

    Winter snacking often leans towards the rich and indulgent – but sometimes what we crave is something warm, savoury, and satisfying, without feeling heavy. These herb-roasted chickpeas are exactly that: crispy on the outside, soft in the middle, and gently seasoned with winter herbs that fill the kitchen with comforting aromas as they roast.

    They’re perfect for slow afternoons at home, cosy evenings curled up on the sofa, or as a wholesome nibble alongside soups, stews, and winter salads. Simple to make, nourishing, and deeply comforting, this is the kind of snack you’ll find yourself making again and again through the colder months.

    Ingredients (serves: 2–3 as a snack)

    • 1 tin (400 g) chickpeas, drained and rinsed
    • 1 tbsp olive oil
    • ½ tsp dried rosemary
    • ½ tsp dried thyme
    • ½ tsp smoked paprika
    • ½ tsp garlic powder
    • Salt and black pepper, to taste

    Optional extras:

    • Pinch of chilli flakes for warmth
    • Grated Parmesan after roasting
    • Lemon zest for brightness

    Recipe

    Step 1: Preheat & Prepare

    Preheat your oven to 200°C (fan).
    Drain and rinse the chickpeas, then pat them very dry with a clean tea towel – this helps them crisp up beautifully.

    Step 2: Season

    Place the chickpeas in a bowl and toss with olive oil, rosemary, thyme, smoked paprika, garlic powder, salt, and pepper until evenly coated.

    Step 3: Roast

    Spread the chickpeas in a single layer on a baking tray.
    Roast for 30–35 minutes, shaking the tray halfway through, until golden, crisp, and fragrant.

    Step 4: Cool Slightly & Serve

    Allow to cool for a few minutes – they’ll crisp up even more as they cool.
    Taste and adjust seasoning if needed.

    Why Herb-Roasted Chickpeas Are Perfect for Winter

    These little bites are wonderfully suited to the colder season because they’re:

    • Warm and comforting straight from the oven
    • Full of earthy, herbal flavours
    • Nourishing and protein-rich
    • Crunchy and satisfying
    • Easy to make in small batches

    They’re a lovely alternative to crisps or biscuits on winter evenings, especially when paired with a hot drink or enjoyed alongside a bowl of soup.

    Ways to Enjoy Them

    Herb-roasted chickpeas are beautifully versatile. Enjoy them:

    • As a cosy sofa snack
    • Sprinkled over winter salads or grain bowls
    • Scattered on top of soups for crunch
    • Served alongside a cheese board
    • Packed into lunchboxes
    • As a nibble while journalling, reading, or watching a winter film

    They’re also perfect for festive grazing boards when you want something lighter but still flavourful.

    Winter Flavour Variations

    • Rosemary & Sea Salt – classic and cosy
    • Garlic & Parmesan – rich and comforting
    • Smoked Paprika & Thyme – warm and earthy
    • Cinnamon & Paprika – subtle spice with depth
    • Lemon & Herb – brightens darker winter days

    Create a Cosy Winter Moment

    Make these on a quiet winter afternoon when:

    • the oven is already on
    • music or an audiobook plays softly
    • daylight fades early
    • you want something warm and savoury without fuss

    Let the herb-filled aroma drift through the kitchen – it instantly makes the home feel snug and welcoming.

    Final Thoughts

    These herb-roasted chickpeas are a winter snack that feels both nourishing and indulgent – warm, crunchy, and full of comforting flavour. They’re simple to make, endlessly adaptable, and perfect for embracing the slower rhythm of the season.

    Roast a batch, pour something warm to drink, and enjoy a small, cosy moment – winter snacking at its best. 

  • Cedarwood Candle Making: A Cosy Winter Craft for Calm, Woodsy Evenings

    Cedarwood Candle Making: A Cosy Winter Craft for Calm, Woodsy Evenings

    Winter invites us to slow down – to lean into gentle rituals, warm scents, and the simple act of making something beautiful with our hands. Candle making is one of the most soothing winter crafts, and cedarwood is the perfect scent for the season.

    Earthy, grounding, and reminiscent of winter forests, cedarwood brings a sense of warmth and calm to the home. When blended into a homemade candle, the scent fills your space with a soft, natural cosiness – ideal for dark evenings, quiet moments, and creating that snug winter atmosphere.

    Making your own cedarwood candle is easier than you might think, and it feels wonderfully rewarding. Here’s how to craft your own woodsy, winter candle at home.

    Why Cedarwood Is a Perfect Winter Scent

    Cedarwood smells like:

    • log cabins
    • crisp forest walks
    • freshly cut wood
    • warm, earthy stillness

    It pairs beautifully with winter’s mood – grounding, comforting, and timeless.

    Cedarwood is also known for its calming properties, making it perfect for:

    It’s the kind of scent that helps you unwind deeply on cold days.

    Supplies You’ll Need

    For two medium candles:

    • 200 g soy wax flakes
    • 2 candle wicks (cotton or wooden)
    • 2 heatproof jars or containers
    • 20–25 drops cedarwood essential oil
    • 1–2 drops vanilla, patchouli, or orange (optional for blending)
    • Wick stickers or a dab of melted wax
    • Wooden stirrer or spoon
    • Double boiler or heatproof bowl
    • Thermometer

    How to Make Cedarwood Winter Candles

    Step 1: Prepare Your Jars

    • Attach the wick to the bottom of each jar using stickers or melted wax.
    • Keep the wick centred by securing it around a pencil or wick holder resting across the top.

    Step 2: Melt the Wax

    • Place the wax in a heatproof bowl over a saucepan of simmering water (double boiler).
    • Heat until fully melted and smooth.
    • Remove from heat and allow to cool slightly – you want it around 65–70°C before adding fragrance.

    Step 3: Add the Scent

    Stir in:

    • 20–25 drops cedarwood essential oil
    • Optional: 1–2 drops vanilla, orange, or patchouli for a winter blend

    Mix slowly for 30 seconds to distribute the fragrance.

    Step 4: Pour the Wax

    • Carefully pour the wax into your jars, keeping the wick upright.
    • Leave a little space at the top for a clean finish.

    Step 5: Set & Cure

    • Allow the candles to cool undisturbed for several hours.
    • Trim the wick to around 5 mm after setting.
    • For best scent performance, let them cure for 24–48 hours before burning.

    Now you have beautifully scented winter candles ready to enjoy.

    Optional Winter Fragrance Blends

    Cedarwood pairs wonderfully with other cosy notes:

    Cedarwood + Orange

    Bright, cheerful, festive.

    Cedarwood + Vanilla

    Soft, warm, comforting – perfect for bedrooms.

    Cedarwood + Cinnamon

    Spicy and woody – ideal for living spaces.

    Cedarwood + Patchouli

    Earthy and grounding.

    Cedarwood + Rosemary

    Fresh, herbal, and wintry.

    How to Set a Cosy Winter Atmosphere with Your Candle

    Light your cedarwood candle during:

    • slow winter evenings with a blanket
    • quiet morning journalling
    • reading in your favourite nook
    • a warm bath after a frosty walk
    • festive gatherings where soft, natural fragrance adds warmth

    Its subtle woodsy scent fills the home with winter calm.

    Final Thoughts

    Cedarwood candle making is a winter craft that feels simple yet deeply comforting. As the wax cools, the scent drifts gently through your home – grounding, calming, and beautifully reminiscent of winter forests.

    Whether you keep them for yourself or gift them to loved ones, these candles bring a handmade warmth to the coldest months of the year.

    Light one, pour a warm drink, and let the cosiness settle in. 

  • Creamy Mashed Potato: The Ultimate Winter Comfort Side Dish

    Creamy Mashed Potato: The Ultimate Winter Comfort Side Dish

    There are few things as quietly comforting as a bowl of creamy mashed potato on a cold winter’s day. Soft, buttery, and indulgently smooth, mash is one of those timeless dishes that instantly makes a meal feel warmer, slower, and more nourishing.

    In winter, when we naturally gravitate towards hearty stews, roasts, and pies, mashed potato becomes the perfect companion – soaking up sauces, adding richness, and bringing a sense of homely familiarity to the table. Simple though it may be, good mash is something to savour.

    Why Mashed Potato Is Perfect for Winter

    Mashed potato suits the colder months beautifully because it is:

    • warming and filling
    • soft and comforting
    • endlessly versatile
    • made from simple, affordable ingredients
    • the perfect base for rich winter dishes

    It’s food that feels grounding – the kind you enjoy slowly, preferably with a blanket nearby and a steaming plate in front of you.

    Ingredients (serves: 4 as a side)

    • 1 kg floury potatoes (such as Maris Piper or King Edward)
    • 50 g butter
    • 100–150 ml whole milk or double cream (to taste)
    • Salt and freshly ground black pepper

    Optional additions:

    • splash of cream for extra richness
    • a little grated nutmeg
    • roasted garlic
    • chopped chives or parsley

    Recipe

    Step 1: Cook the Potatoes

    Peel and chop the potatoes into even-sized pieces.
    Place them in a large saucepan of cold, salted water and bring to the boil.
    Simmer for 15–20 minutes, until very tender.

    Step 2: Drain & Dry

    Drain the potatoes well, then return them to the hot pan for a minute to allow excess moisture to steam away. This helps create fluffier mash.

    Step 3: Mash Until Smooth

    Mash the potatoes thoroughly using a potato masher or ricer until smooth and lump-free.

    Step 4: Add Butter & Milk

    Add the butter first, allowing it to melt into the warm potatoes.
    Gradually pour in the milk or cream, stirring gently until you reach your preferred consistency.

    Step 5: Season & Serve

    Season generously with salt and black pepper.
    Serve hot, with a final knob of butter melting on top if you like.

    Winter Variations

    Mashed potato is wonderfully adaptable. Try these twists:

    • Garlic Mash: stir through roasted garlic for deep flavour
    • Cheesy Mash: add grated cheddar or Parmesan
    • Mustard Mash: a spoon of wholegrain or Dijon mustard
    • Herb Mash: fresh thyme, chives, or parsley
    • Creamy Leek Mash: fold through softened leeks

    Each variation pairs beautifully with winter mains.

    What to Serve with Creamy Mash

    Creamy mashed potato is the perfect partner to so many winter dishes, including:

    It’s also delicious served simply, with gravy and seasonal greens.

    Create a Cosy Winter Table

    Mashed potato has a way of anchoring a winter meal. Serve it when:

    • the evenings are dark
    • candles are lit on the table
    • the kitchen feels warm
    • comfort is the priority

    Bring the bowl straight to the centre of the table and let everyone help themselves – it’s food meant to be shared.

    Final Thoughts

    Creamy mashed potato is winter comfort food in its purest form – simple, soft, and deeply satisfying. It doesn’t shout for attention, but it quietly makes every winter meal better.

    Warm, buttery, and familiar, it’s the kind of dish that reminds us why home cooking feels so comforting when the weather turns cold. 

  • Homemade Cranberry Sauce: A Simple, Bright, and Festive Winter Staple

    Homemade Cranberry Sauce: A Simple, Bright, and Festive Winter Staple

    Homemade cranberry sauce is one of those winter recipes that feels wonderfully rewarding – so simple to make, yet so full of flavour and seasonal charm. With its jewel-red colour, gentle sweetness, and tart sparkle, cranberry sauce brings brightness to even the heartiest winter dishes.

    Whether it’s served alongside a Sunday roast, spooned over festive meats, added to sandwiches, or enjoyed as part of a cosy winter grazing board, a freshly made cranberry sauce elevates everything around it. And the best part? It takes just minutes to prepare.

    Perfect for Christmas dinner, winter gatherings, or a quiet meal at home, this homemade version tastes fresh, vibrant, and beautifully seasonal.

    Ingredients (makes: 1 small bowl – approx. 6 servings)

    • 250 g fresh or frozen cranberries
    • 100 g caster sugar
    • 100 ml orange juice (fresh or bottled)
    • Zest of ½ an orange
    • Optional extras:
      • 1 cinnamon stick
      • A splash of port
      • A pinch of nutmeg
      • A few drops of vanilla extract

    Recipe

    Step 1: Combine Ingredients

    Place the cranberries, sugar, orange juice, and orange zest into a small saucepan.

    Step 2: Simmer Gently

    Heat over medium-low, stirring occasionally.
    The cranberries will begin to burst and soften – this is where the sauce develops its texture.

    Step 3: Add Spices (Optional)

    For a festive twist, add a cinnamon stick, a splash of port, or a pinch of warming spice.

    Step 4: Thicken

    Simmer for 10–12 minutes, until the sauce thickens and turns glossy.
    It will continue to thicken as it cools.

    Step 5: Cool & Serve

    Allow to cool before serving.
    Store in the fridge for up to 1 week.

    Why Homemade Cranberry Sauce Is Worth Making

    There’s a freshness to homemade cranberry sauce you just can’t get from a jar.
    It’s:

    • brighter in flavour
    • naturally tangy
    • full of real fruit texture
    • adjustable in sweetness
    • beautifully aromatic with orange and winter spices

    The deep ruby colour looks gorgeous on a winter table – a splash of festive brightness against golden roasts and cosy side dishes.

    Serving Suggestions

    Cranberry sauce is wonderfully versatile. Serve it with:

    • Roast turkey, chicken, beef, or pork
    • Festive stuffing
    • Winter veggie wellington
    • Cheese boards (lovely with brie or cheddar!)
    • Warm buttery rolls
    • Boxing Day leftover sandwiches

    It also makes a delicious addition to baked camembert, pastry tarts, or even spooned onto porridge for a festive breakfast twist.

    Variations to Try

    • Cranberry & Cinnamon: Add a cinnamon stick for warmth.
    • Cranberry & Port: Rich, grown-up flavour perfect for Christmas dinner.
    • Cranberry & Apple: Add diced apple for extra sweetness and texture.
    • Cranberry & Ginger: Fresh ginger for a little kick.
    • Cranberry & Vanilla: Softer, creamier undertones.

    Cosy Winter Atmosphere

    Making cranberry sauce fills the kitchen with winter aromas – citrus, spice, and gentle sweetness. It’s the kind of small, simple ritual that adds warmth to the season.

    Enjoy it while:

    • preparing a winter roast
    • listening to festive music
    • letting snow fall (or rain patter) outside
    • hosting loved ones
    • planning a cosy holiday meal

    It’s the little touches that make winter feel magical.

    Final Thoughts

    Homemade cranberry sauce is a winter classic – bright, festive, and incredibly easy to make. With just a handful of ingredients and a few minutes on the hob, you can create a beautiful sauce that adds colour, sparkle, and seasonal warmth to your winter meals.

    Stir, simmer, and enjoy the quiet comfort of this simple festive recipe. 

  • Roasted Root Vegetables: A Simple, Comforting Winter Side for Cold Days

    Roasted Root Vegetables: A Simple, Comforting Winter Side for Cold Days

    When winter arrives, root vegetables truly come into their own. Earthy, nourishing, and deeply satisfying, they’re the backbone of so many comforting winter meals. Roasted root vegetables are one of the simplest and most rewarding ways to enjoy them – caramelised at the edges, soft in the middle, and filled with natural sweetness brought out by slow roasting.

    Whether served alongside a Sunday roast, spooned into grain bowls, or enjoyed straight from the tray with a little salt and pepper, this is winter cooking at its most honest and comforting.

    Why Root Vegetables Are Perfect for Winter

    Root vegetables are made for colder months. Grown slowly underground, they’re hardy, filling, and full of flavour.

    Winter root vegetables include:

    • carrots
    • parsnips
    • potatoes
    • sweet potatoes
    • swede
    • beetroot
    • celeriac

    When roasted, their natural sugars caramelise, creating rich flavour with very little effort – perfect for winter’s slower rhythm.

    Ingredients

    • 2 carrots, peeled and chunked
    • 2 parsnips, peeled and chunked
    • 2 potatoes or sweet potatoes, cubed
    • ½ swede or celeriac, cubed (optional)
    • 2–3 tbsp olive oil
    • 1 tsp dried thyme or rosemary
    • Salt and black pepper

    Optional additions:

    • red onion wedges
    • whole garlic cloves
    • drizzle of honey or maple syrup
    • sprinkle of chilli flakes

    Recipe

    Step 1: Preheat the Oven

    Preheat your oven to 200°C (fan).
    Line a large roasting tray with parchment if you prefer easier cleaning.

    Step 2: Prepare the Vegetables

    Place all the chopped vegetables into the tray.
    Drizzle with olive oil and scatter over herbs, salt, and pepper.

    Step 3: Roast

    Toss everything well so the vegetables are evenly coated.
    Roast for 40–50 minutes, turning once halfway through, until golden, tender, and lightly crisp at the edges.

    Step 4: Serve

    Taste and adjust seasoning.
    Serve hot, straight from the tray or transferred to a warm serving dish.

    Winter Variations

    • Honey & Thyme: add honey for gentle sweetness
    • Garlic & Rosemary: classic and deeply comforting
    • Spiced Roots: add paprika, cumin, or cinnamon
    • Maple & Mustard: perfect with pork or sausages
    • Crispy Finish: sprinkle with Parmesan for the last 5 minutes

    Each variation keeps the same cosy winter base with a slightly different flavour.

    How to Serve Roasted Root Vegetables

    These vegetables are wonderfully versatile. Serve them with:

    They’re also lovely when enjoyed simply, with a dollop of mustard or gravy.

    Create a Cosy Winter Kitchen Moment

    Roasting root vegetables is one of those winter rituals that gently warms the home. The oven hums, the vegetables slowly caramelise, and the kitchen fills with comforting, earthy aromas.

    This is the kind of cooking that suits:

    • quiet winter afternoons
    • Sunday meal prep
    • simple family dinners
    • slow evenings when it’s cold outside

    No rush – just warmth, simplicity, and good food.

    Final Thoughts

    Roasted root vegetables are winter comfort food at its most reliable – simple ingredients, gentle flavours, and a dish that always feels nourishing and grounding. They remind us that good food doesn’t need to be complicated, especially in winter.

    Turn on the oven, roast slowly, and enjoy the warmth that follows. 

  • Salted Caramel Hot Chocolate: A Rich, Indulgent Winter Drink for Cosy Evenings

    Salted Caramel Hot Chocolate: A Rich, Indulgent Winter Drink for Cosy Evenings

    When winter evenings draw in early and the air turns cold, there’s something deeply comforting about wrapping your hands around a mug of salted caramel hot chocolate. Rich, velvety, and gently sweet with a hint of salt, this drink feels like a true winter indulgence – the kind you save for quiet nights at home, festive film evenings, or moments when you want something extra comforting.

    Salted caramel adds depth and warmth to classic hot chocolate, balancing sweetness with a subtle savoury note that makes every sip feel luxurious and satisfying. It’s winter comfort in a mug.

    Why Salted Caramel Is Perfect for Winter

    Salted caramel has a richness that suits colder months beautifully.
    It’s:

    • warm and indulgent
    • deeply comforting
    • perfect for slow evenings
    • festive without being overpowering
    • ideal for treating yourself or guests

    Paired with hot chocolate, it becomes a drink that feels special yet wonderfully familiar.

    Ingredients (serves: 2 mugs)

    • 500 ml whole milk (or oat milk for extra creaminess)
    • 2 tbsp cocoa powder or 50 g dark chocolate, chopped
    • 2 tbsp caramel sauce (shop-bought or homemade)
    • 1 tbsp sugar or honey (optional, to taste)
    • Pinch of sea salt
    • ½ tsp vanilla extract

    To serve (optional):

    • Whipped cream
    • Extra caramel drizzle
    • Chocolate shavings
    • A light sprinkle of sea salt

    Recipe

    1. Heat the Milk

    Pour the milk into a small saucepan and warm gently over a low heat. Do not boil.

    2. Add Chocolate & Caramel

    Whisk in the cocoa powder (or chopped chocolate), caramel sauce, sugar (if using), vanilla, and a pinch of sea salt until smooth and glossy.

    3. Warm & Combine

    Continue heating gently, whisking often, until the hot chocolate is rich, smooth, and steaming.

    4. Taste & Adjust

    Taste and adjust sweetness or salt if needed – the balance of sweet and salty is what makes this drink special.

    5. Serve

    Pour into mugs and top with whipped cream, a drizzle of caramel, and a tiny pinch of sea salt if desired.

    When to Enjoy Salted Caramel Hot Chocolate

    This cosy winter drink is perfect for:

    • quiet evenings by the fire
    • festive movie nights
    • snowy or frosty afternoons
    • after a winter walk
    • Christmas wrapping sessions
    • slow Sundays at home

    It’s especially lovely served in your favourite winter mug, with a blanket close by.

    Winter Variations

    • Extra Indulgent: Use double cream for half the milk
    • Dairy-Free: Use oat or almond milk
    • Spiced Caramel: Add a pinch of cinnamon or nutmeg
    • Mocha Twist: Add a shot of espresso
    • Adult Treat: Offer a splash of Baileys or salted caramel liqueur on the side

    Final Thoughts

    Salted caramel hot chocolate is winter indulgence at its finest – rich, smooth, and deeply comforting. Whether you enjoy it as a quiet treat for yourself or serve it to guests on a cold evening, it’s the kind of drink that slows the moment and makes winter feel warmer.

    Pour a mug, curl up somewhere cosy, and enjoy every sip.